New year -> New yoga goals!

Happy New Year!

Hope you’ve had a great holiday and thay you’ve got your newyears resalutions ready! 🙂 My main yoga goals for 2015 is pressup handstand with both legs and getting more control in handstand to get better at making shapes. I’d also like to get more flexible and improve my balance over all.

Above is a video of a flow I put together with crow (bakasana) to handstand back to crow and then to one legged crow. Theese transitions where some of the goals I accomplished this year and I’m so proud and thankful for the progress.   I can’t believe that I had my accident a few months ago and I’ve healed this fast. I never thought I would be better at handstands than before the accident, I was afraid I would’nt be able to do it at all! Super thankful for yoga in this fast progress. This year I started this blog and my Instagram @yogaripped and I’m so happy I did! What a wonderful way to workout! I’ve gotten amazing inspiration from theese wonderful communities and so much support from all you awesome readers, THANK YOU! It has really helped me stay positive and motivated this year!

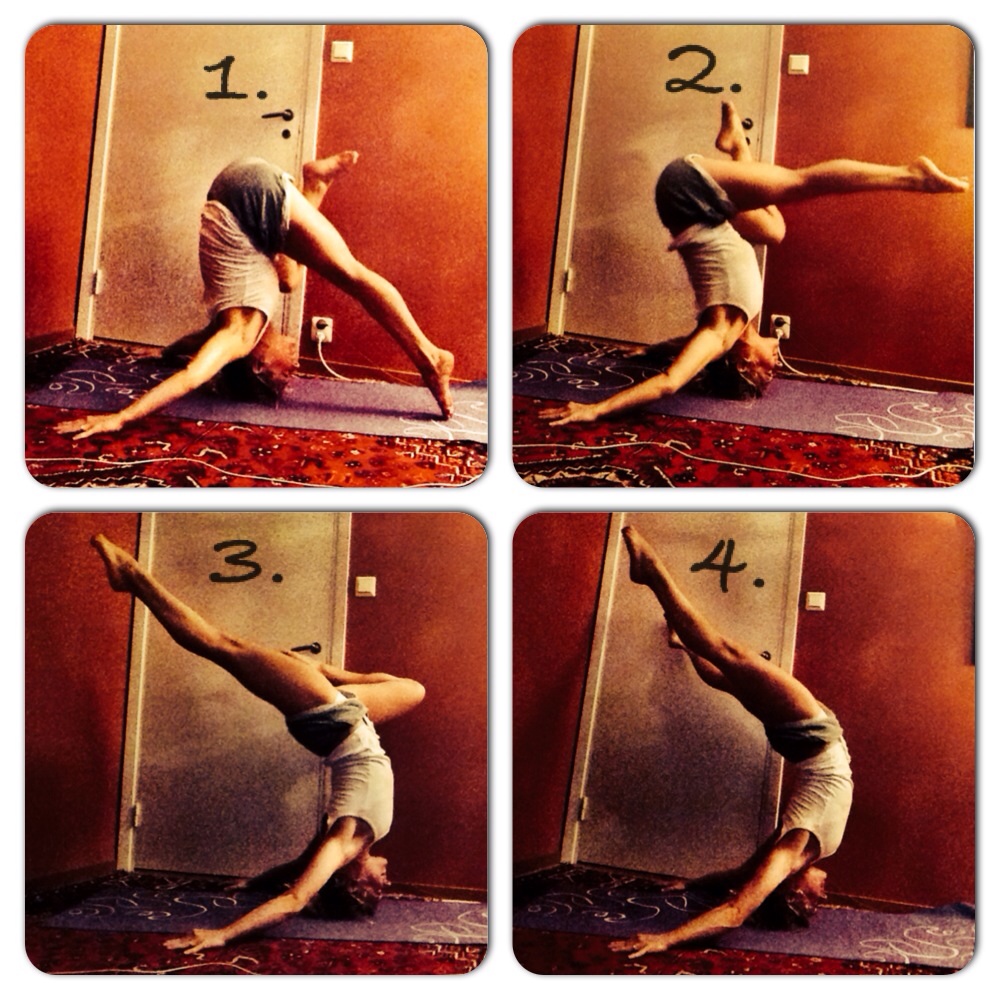
Now to some yoga tips for pressup from crow to handstand and back.

1. Start with your back against the wall and use your head and back for balance pressed against the wall when you lift your legs from your knees.

2. When you can do this, practice it to build thoose muscles and stability. When you feel ready, try without a wall but with a strap around your triceps, right above your elbows. This helps to keep your arms stable.

3. When pressing up, push your elbows and legs towards your center, this will help you focus strength in your core and keep your arms stable.

4. Lean forward with your upperbody to make the curve of your back more straight, this makes it easier to lift your legs.

5. When your float of thoose knees use your fingers to keep balance in your hands and hold your focus in the floor.

6. Getting down to crow again is the same technique but now you start by lowering your legs as the same time as you lean forward, getting your upperbody slightly in front of your arms. Focus focus focus your core and slowly land on your arms. It’s all about practice! I can’t count the times I’ve tried this and failed. Just stay consistent in your workout and it will come! Goals are great because they can keep you motivated and when you accomplish then you feel great. And a fat bonus is getting ripped in the process 🙂

Good luck with your goals everyone!

Love


Lotus-tripod-bakasana!

image   image

This is a great challenge for corestrength, flexibility and balance, my favourite combination! 🙂

  1. Start in lotus position. Sit here for a while and breath, filling your muscles with oxygen and stretching to get deeper in lotus. Lets get flexy!
  2. Now come up on your knees. If it hurts, put something soft between your knees and mat.
  3. Now this is tough. Put one knee on your arm.
  4. Put your head against the floor and press your weight on your arm to lift up your  other knee up to your other arm. Corestrength is key here, make sure its supertight:)
  5. When your up with both knees. Shift weight to your head and hand and use your core to press upp to lotus tripod.
  6. For the next level – try coming down again with your knees landing on your arms. Corestrength again, tighten that core and tuck thoose legs slowly back down.
  7. Now here is the big balance challenge! Slowly shift your weight to your hand and lift your head to come up in lotus bakasana!


Funky tripod step by step!

image


  1. Start in a regular tripod. Use a wall if you need help with balance. Keep your legs close to your body and tighten your core.
  2. Now put your feet together and move your weight a little bit to one side and put your arm out on the other side.
  3. Move your weight a little to the other side and put your other arm out. Now keep your wieght in the center, Spread your fingers and use your arms and fingermuscles to help with balance.
  4. For the next level, tighten your fingers evan more so that you balance on your fingers instead of your palms.

image


Another fun variation is to put your legs in lotus!

Good luck yogis!


Wheel-pose!

image image


This pose recently became possible for me! If this pose feels impossible I really recommend practicing the earlier steps and practicing with holding a elastic strap tighed around your feet – worked for me!

  1. Start by laying on your stomach. Lift your feet and try to reach your legs with your hands. Relax your neck. Breath in and out a few times and feel how it affects your balance. Experiment by tightening your legs and pulling your upper body up, and relaxing your legs and pulling them closer to your upper body.
  2. If you feel ready for the next step, put a strap around your foot and pulling it up with your arm. Keep your other arm and leg in previous position. If you get really close with your foot to your arm you can try without a strap – reach for your foot behind you, rotate your wrist and hold your foot. Aim to have your arm and leg as straight as possible.
  3. Now try with the strap on both feet holding it with both arms. When you feel ready, start in position 1. Then let go of your legs but try to keep them up. Rotate your wrists, grab your toes and pull your feet up. Good luck!

Super-stretch!

image image image


  1. Start by laying on the side and putting your leg over your shoulder. Keep tension in your core and your other leg to help with balance.
  2. Grab your foot and straighten your leg behind your shoulder. Help with your other arm for support.
  3. Slowly let go of your “upper arm”, flex your other leg and try to reach your foot for an even more intense stretch!

Broken flying lizard!

image


Promised some new poses with instructions so here’s the first one! It’s a challenging pose and I recently rescovered it, hope you like it:)

  1. Start by putting your leg over your shoulder like your putting on a backpack.
  2. Now bend over and try to move your foot so that your “backfoot” faces the floor. Then move your foot back between your legs and lift your toes.
  3. Try to move your weight over to your arms so that you can let go of your other foot from the floor. Keep tension in your arms and legs to help with balance.
  4. Now try lifting your back leg even higher to create a more challenging shape!

Firefly pose – step by step!

image


  1. Start by putting your leg over your shoulder like your putting on a backpack. Remember to stretch your hips and hamstrings first.
  2. Now put your other leg over your shoulder and try to squeese in your arms so that your legs are as far up on your shoulders as possible.
  3. Come down with your butt and slowly move your legs frontward, still touching your toes in the floor.
  4. Try to straighten your legs at the same time as you tighten your core and arms. Try to straighten your arms and back and tighten your legs all the way out to your toes. Good luck yogis!


One leg crowpose – step by step!

image image image image image


  1. Start in bakasana. Try to straighten your arms as much as possible and lift up your feet towards your but. (Check bakasana video in top menu for instructions)
  2. Now slowly try to shift over a little of your weight to one arm, when you feel ready try lifting your leg of your arm and rest it against your other leg. Hold your tension in your feet and keep a focus in the ground for balance.
  3. If you feel ready for the next step, one leg crowpose, try straightening your leg and lift up both your feet towards the sky so that its mostly your knee resting on your arm. Keep a straight back and remember to keep your stomach really tight to help with balance.
  4. If you feel stable and want to try a fun transition, slowly lower your head to the ground. Keep your arms and stomach strong and put something soft to rest your head on the first time you try this just in case:)!
  5. Now lift your leg up from your arm and come up in headstand! Good luck everyone and be safe:)!

Headstand hollowback variation!

image


Never tried this before! It’s a great challenge especially for your core! Make sure to have a wall behind you in case of falling over;)

  1. Start by putting your head in the floor and your hands in the floor behind you. Spread your fingers and feel your hands strong and in control. Walk with your legs towards your head. Lift one leg bent.
  2. Now tighten your core and your arms and try to kick yourself up to headstand or even better slowly let go of the floor with your foot and pull your leg up with your core, like a press up.
  3.  Now this is tricky, the goal is to shift your balance so that you can get your straight leg behind your head. If it’s really hard, stand close to a wall with the side of your body so that you can put your foot to the wall and help with balance. Keep your core tight and push your hands against the floor to adjust  your balance.
  4. If you want more challenge, try straightening your other leg slowly. If your afraid to fall make sure to have a wall behind you! Good luck yogis!

More pressup handstand tips!

Ok here are some more exercizes for pressup! (Check previous video for earlier steps!)

  1. This time no wall for support but instead start with something to stand on to make it easier – like a fat book:)
  2. If you manage to get up with a block or book try moving down from the book and stand on your toes with your foot against the block/book for support – this is a bit harder.
  3. If you are ready, stand on the floor and try getting up!